Apps
The app provides, among others, the Client ID and Client Secret needed to implement any of the authorization flows.
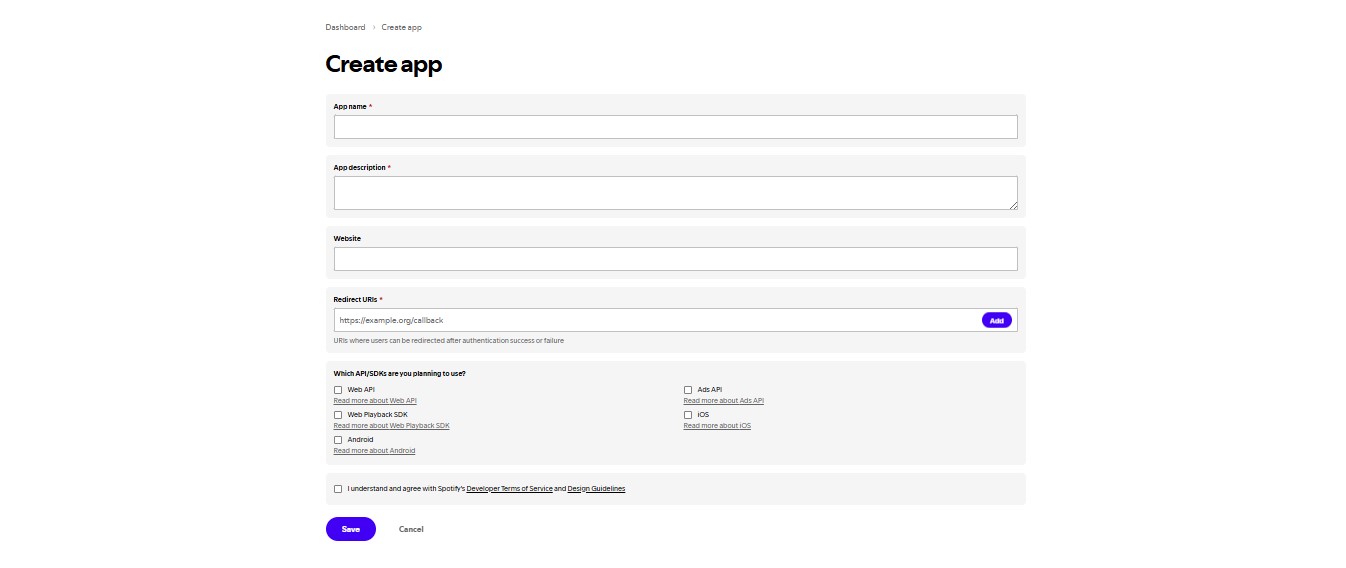
To do so, go to your Dashboard and click on the Create an App button to open the following dialog box:
Steps to Register
-
Enter App Details:
- App Name: Choose a name (e.g., "My Music Explorer").
- App Description: Provide a description (e.g., "An app to explore and manage Spotify music").
- These details will be visible to users during the authorization process.
-
Accept Terms:
- Check the Developer Terms of Service checkbox to agree to the terms.
-
Create the App:
- Click the CREATE button to register your application.
Once completed, your application will be registered, and you’ll be redirected to the app overview page.
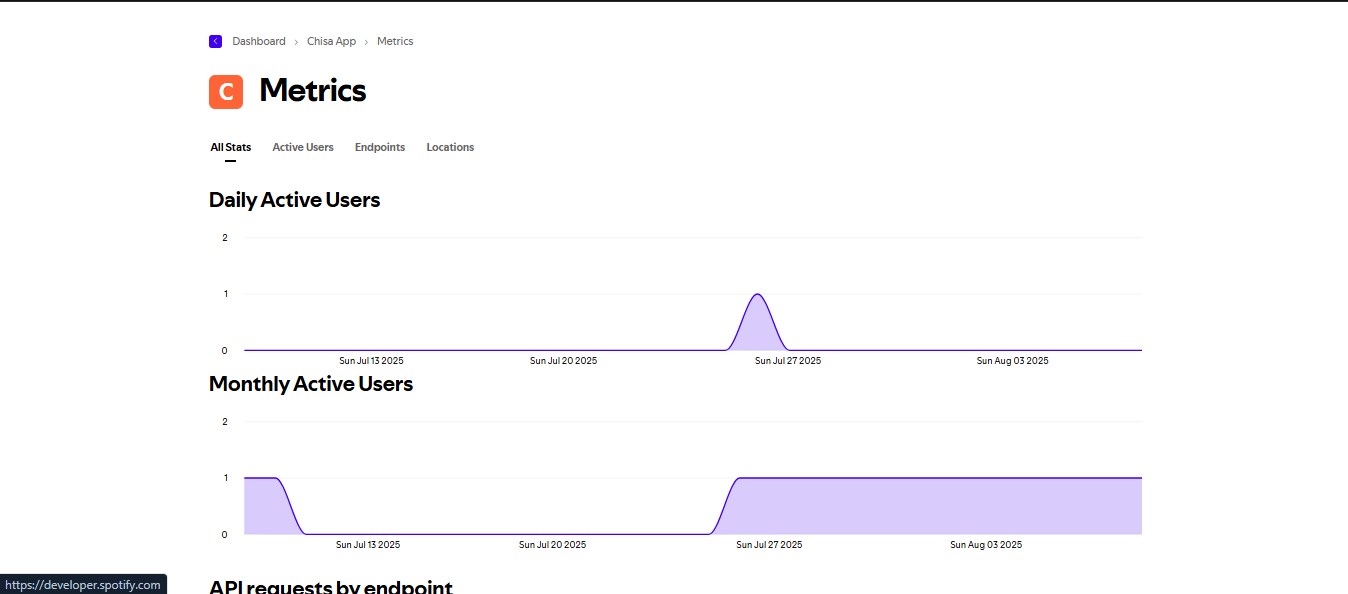
The app overview page in the Spotify Developer Dashboard provides access to various elements to manage and monitor your application.
Key Elements
-
App Metrics:
- Displays data such as daily and monthly active users or the number of users per country.
- Note: Metrics are initially empty until usage data is collected.
-
App Status:
- Indicates your app's current mode, which is set to Development Mode by default.
- In Development Mode, there are limits on the number of users who can install the app and the number of API requests it can make.
- Note: You can request a quota extension by clicking the Request Extension link if needed.
-
App Settings:
- Allows you to configure various app preferences and options.
-
Client ID:
- A unique identifier for your app, used to authenticate API or SDK calls.
-
Client Secret:
- A confidential key required to authorize your Web API or SDK calls.
Keep your Client Secret secure and never share it publicly. If you suspect that the secret key has been compromised, regenerate it immediately by clicking the ROTATE button on the app overview page.
It’s time to set up your app! Follow these steps to configure your application settings in the Spotify Developer Dashboard.

-
Access Settings:
- Click on Edit Settings to view and update your app’s configuration.
- A dialog will appear with editable fields.
-
Update Website Field:
- Add a web domain or URL to the Website field.
- This helps users find more information about your application.
-
Configure Redirect URIs:
- Enter one or more addresses in the Redirect URIs field to allowlist with Spotify.
- These URIs enable the Spotify authentication service to automatically invoke your app when a user logs in (e.g.,
http://127.0.0.1:8080). - Note: For iOS apps, the redirect URI must follow these rules:
- All characters must be lowercase.
- The prefix must be unique to your app (e.g., avoid general prefixes like
http). - The prefix should be used only for Spotify authentication; don’t reuse existing URL schemes.
- Include a path after the first pair of forward slashes.
- Example: If your app is named "My Awesome App", a suitable redirect URI could be
my-awesome-app-login://callback.
-
Add Platform-Specific IDs (Optional):
- For Android apps, fill out the Android Package ID.
- For iOS apps, fill out the Bundle ID.
-
Save Changes:
- Once you’ve updated the settings, click SAVE to apply them.
-
Delete App (Optional):
- To remove your app, click the DELETE red button.
Double-check your Redirect URIs and platform IDs to ensure smooth authentication.